It’s that time of year again!
While others are looking to Black Friday sales, Cyber Monday deals and the start of panic-buying for Christmas – many of us in the photography world are instead looking out for the very latest release of Capture One Pro to land, the amazing raw processing and image editing software from Phase One.
And today, after many months of beta testing, it’s finally here!
Say Hello to Capture One 20 (no, you didn’t miss the 7 versions since Capture One 12, they’ve decided to align the versions to release years, so with the latest release being for 2020 – it’s now Capture One 20).
Having used the new version for a while now (testing, breaking, playing), I can say it’s a noticeable improvement on v12, and it’s clear that a lot of focus has been placed on enhancing usability and making certain tools just that extra bit better.
With all that said, let’s take a look inside at the changes you’re going to see…
Toolbar

The first thing you’re likely to notice is the default setting for the top toolbar – it now includes text under the main icons as the default setting. You can switch that off by right-clicking the top area (and of course, you can still customise the layout to your own preferences) but this is designed to help new users and switchers feel at home from day 1.
Scrollable Areas
For those of you familiar with the workspaces in Capture One Pro, this is a huge change – and a good one!
You now have two areas on each side panel of your workspace – a “pinned” area at the top, and a “scrollable” area below.
In previous versions it could sometimes be difficult to manage your toolsets on each pane, especially on smaller screens as they dropped off the bottom (with constant collapsing and expanding required to see them all).
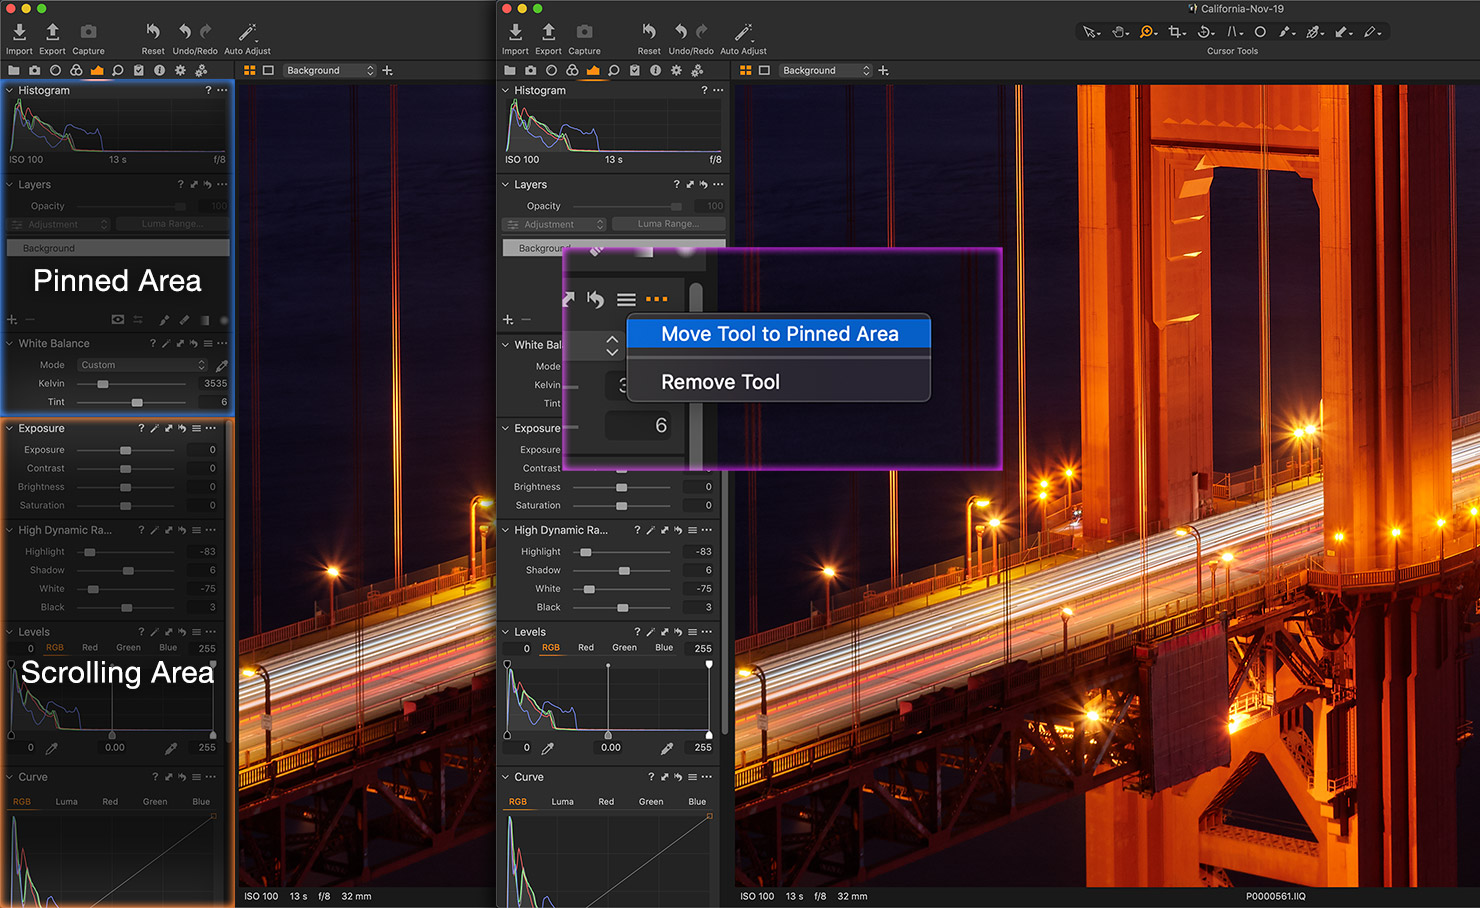
Capture One 20 takes care of that by giving you the ability to pin your most-used tools to the top panel (by clicking the […] on each tool), and have all others scroll up and down the screen below.
For those who use scroll-wheels to adjust sliders, fear not – you can switch the functionality of the wheel to be primarily tool scrolling or slider adjustment with/without the [ALT] key being held, by editing your preferences.
Color Editor
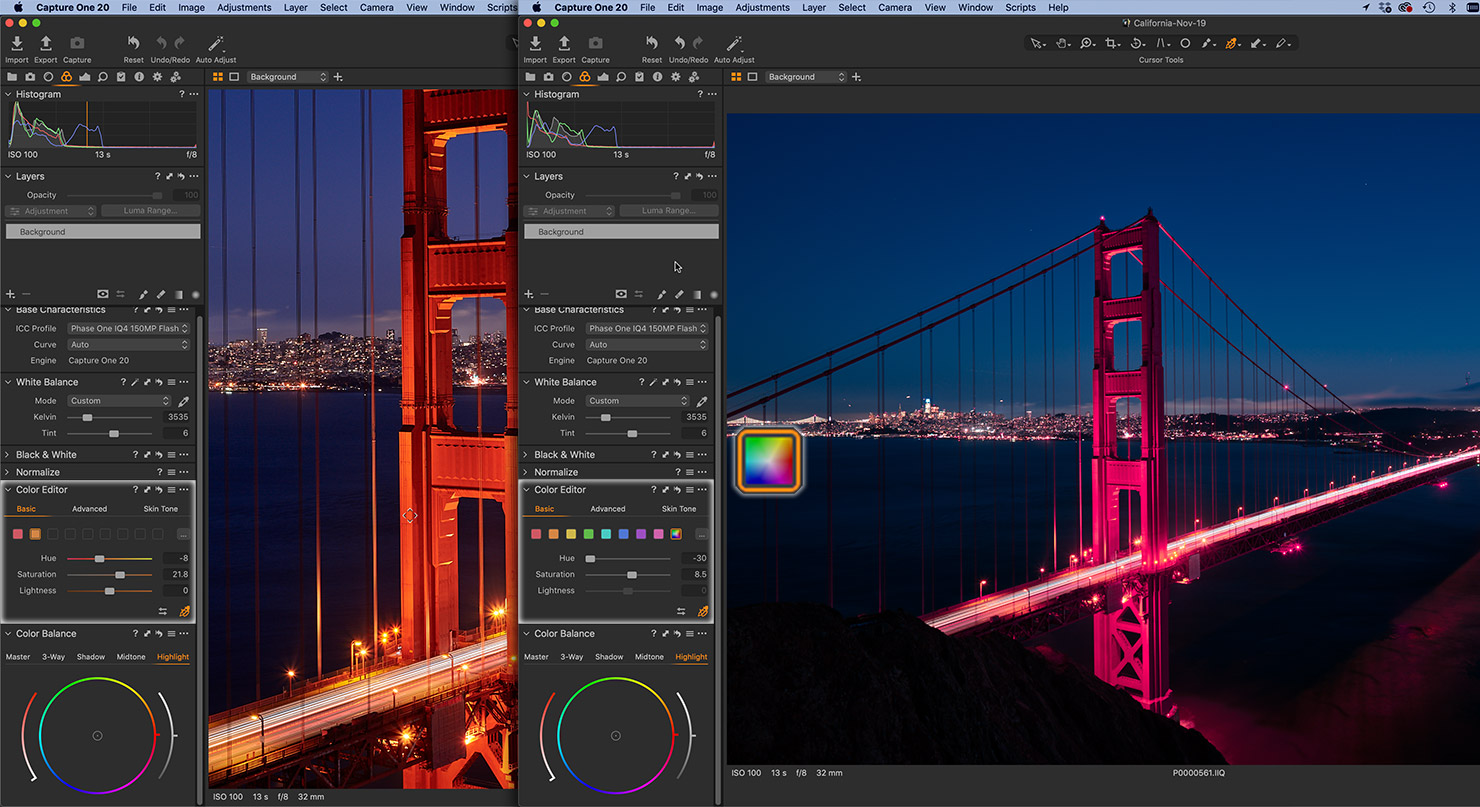
Color/Colour/whatever – the new Basic Color Editor panel is as far from basic as you can now get, at least in terms of its ability to quickly make sweeping changes.
Once you’ve looked past the switch from the trusty old colour wheel we used to use to the new line of swatches above, you might notice that the new “picker” tool has received some pretty important usability improvements.
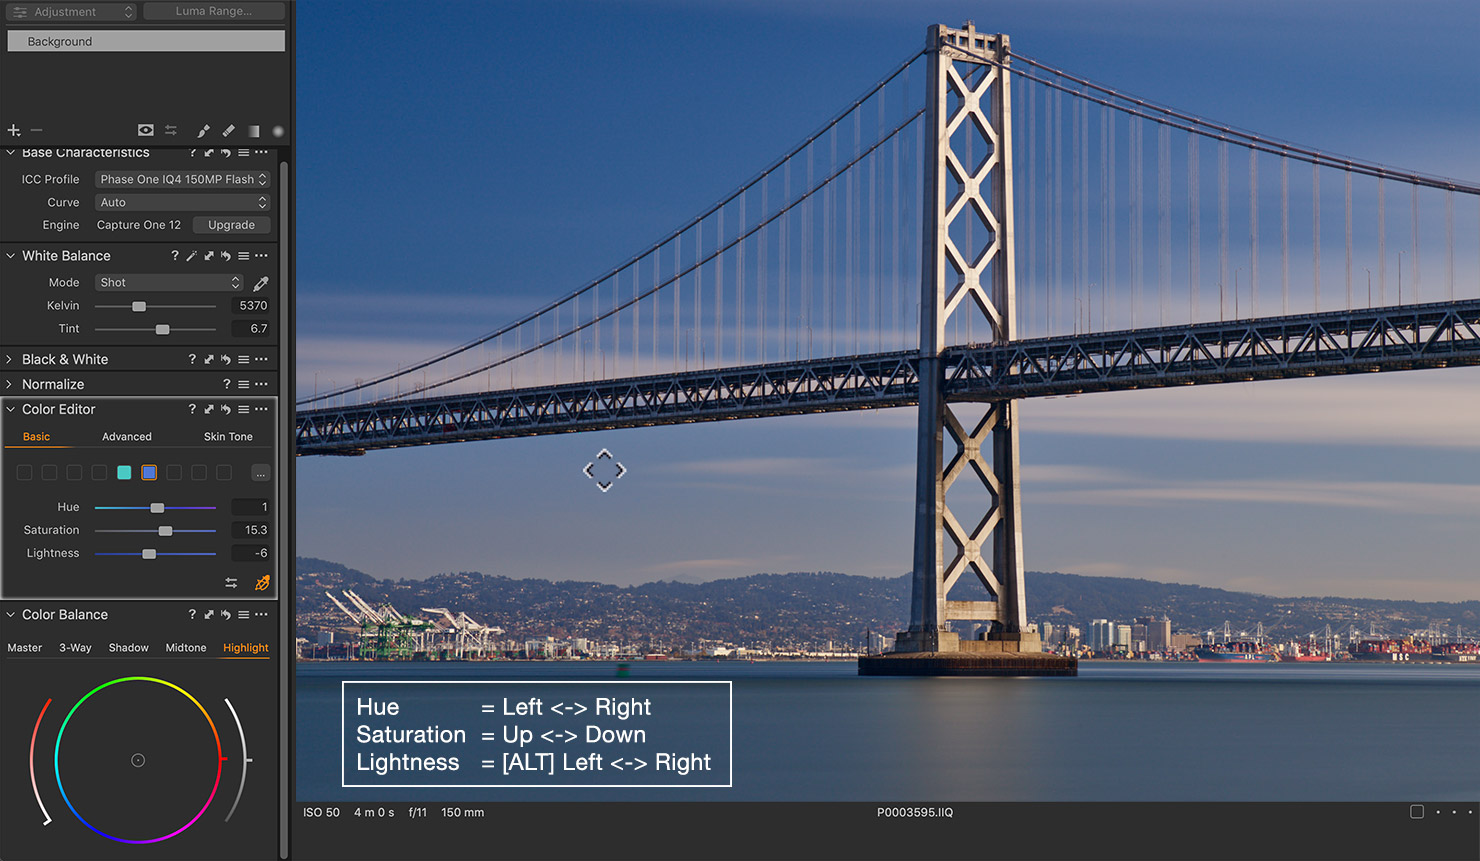
Now, instead of flicking back and forth from the image to the panel, you can just use your mouse direction to select and hold the colour you want to modify and then simply drag up, down, left or right to change its attributes in one go.
Not sure you’re happy with the [ALT] key combination, or want to edit the swatches to match the colour wheel that you prefer? No problem, just click the settings buttons in the panel to change their behaviour to a way that’s perfect for your own workflow.
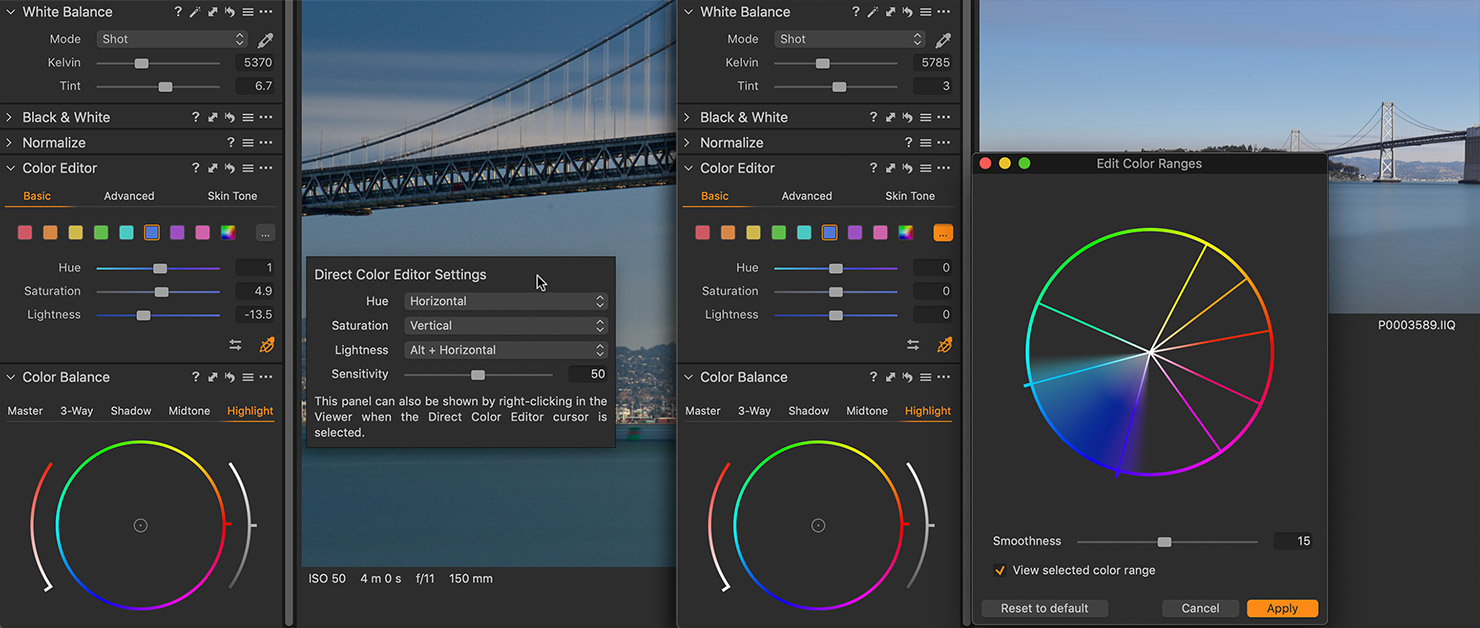
And of course, for those who still insist on shifting the hue of the entire image, the trusty rainbow option is still available at the end of the swatch list for some rather more, well, “dramatic” shifts to be made if that’s your thing…
High Dynamic Range
“Does Capture One do HDR?” – If I had a dollar for every time that question was asked, wow…
If your definition of HDR is “take 15 exposures and automatically blend them into one ridiculous cartoon-esque image” – then the answer is (and always has been) “no”.
However, if your definition of HDR is “getting the very best out of a single shot by accessing the full dynamic range of your camera’s raw data” – then the answer is, and always has been, a resounding “yes”.
It’s just that in Capture One 20, things have just got even better.
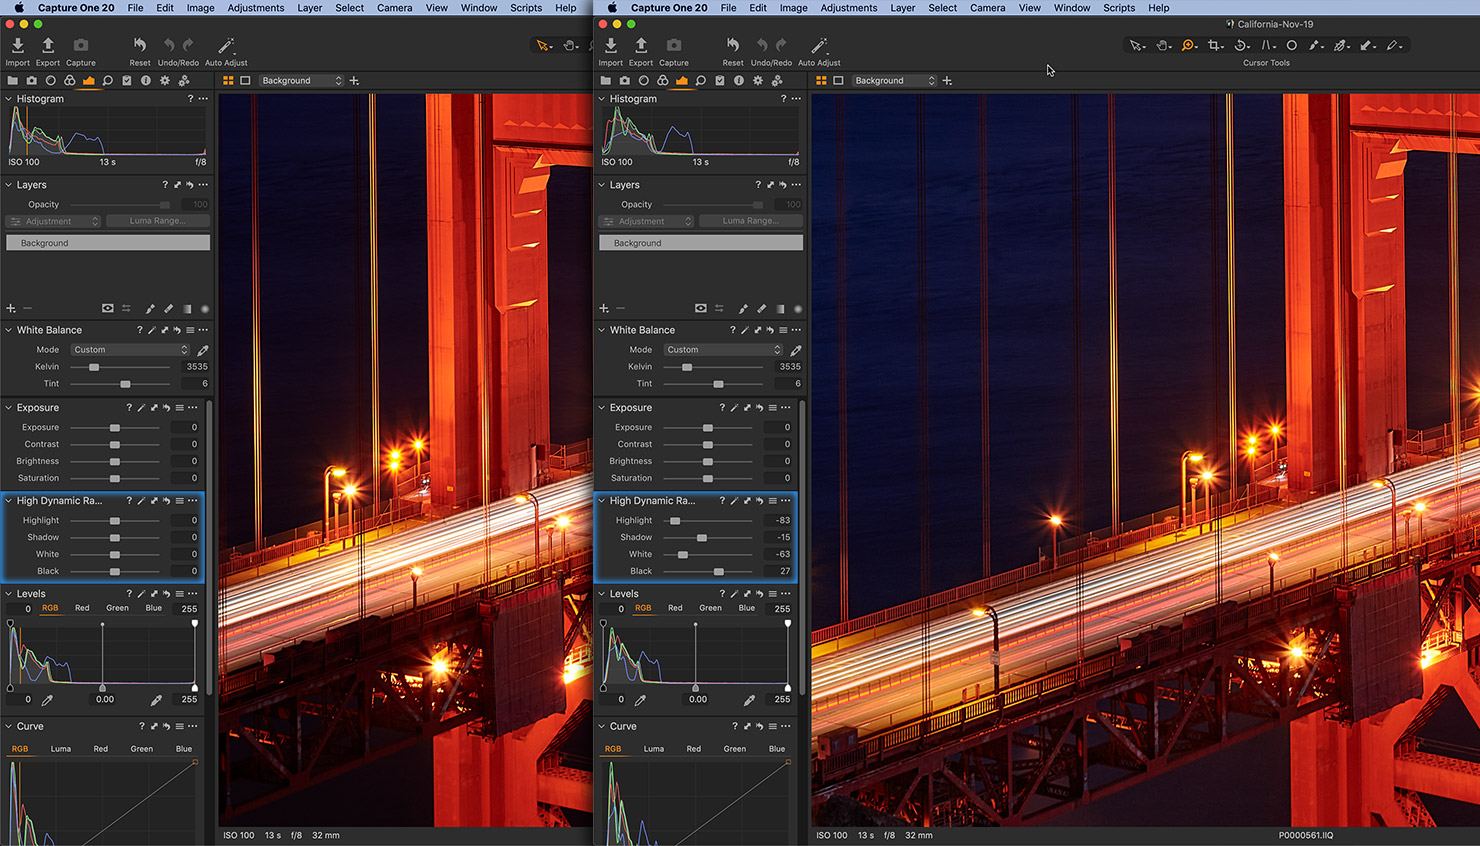
While in all previous versions of Capture One, the High Dynamic Range / HDR panel had been used to “recover” shadows and highlights (going from 0 to 100 in recovery), the new panel starts at zero and can recover OR increase the shadows, highlights – and now, whites & blacks.
At zero on the sliders, there is no change.
Take the highlights slider to a positive number and it will brighten them even more – take it negative, and Capture One recovers them (like we used to do).
Take the shadows slider to a positive number and it will recover them like it used to do, bringing back the details you thought were lost – take it negative, and you’ll see the engine actually increase the shadow depth, delivering deep blacks without needing to adjust curves.
Beyond that, you’ll find there are now “White” and “Black” sliders that have been introduced, which single out only the very highest and lowest exposed pixels for adjustment.
I have to admit, this was the one tool that took me a bit of time to get used to – simply because I was so used to using HDR as a “recovery” tool, where the new sliders work more logically in terms of their effect on the image.
A right-slide means brighter, a left-slide means darker, on each of the 4 options – and the results are as stunningly natural as ever.
Crop Tool
Clearly I’m not alone in my frustration at not being able to just hit the [ENTER] key to apply a crop to an image once it’s set – and Phase One have heard all that feedback!
Now, on completion of your crop settings, hitting the [ENTER] key will take you immediately to the Pan tool, effectively applying the crop for you without needing to go back to the toolbar.
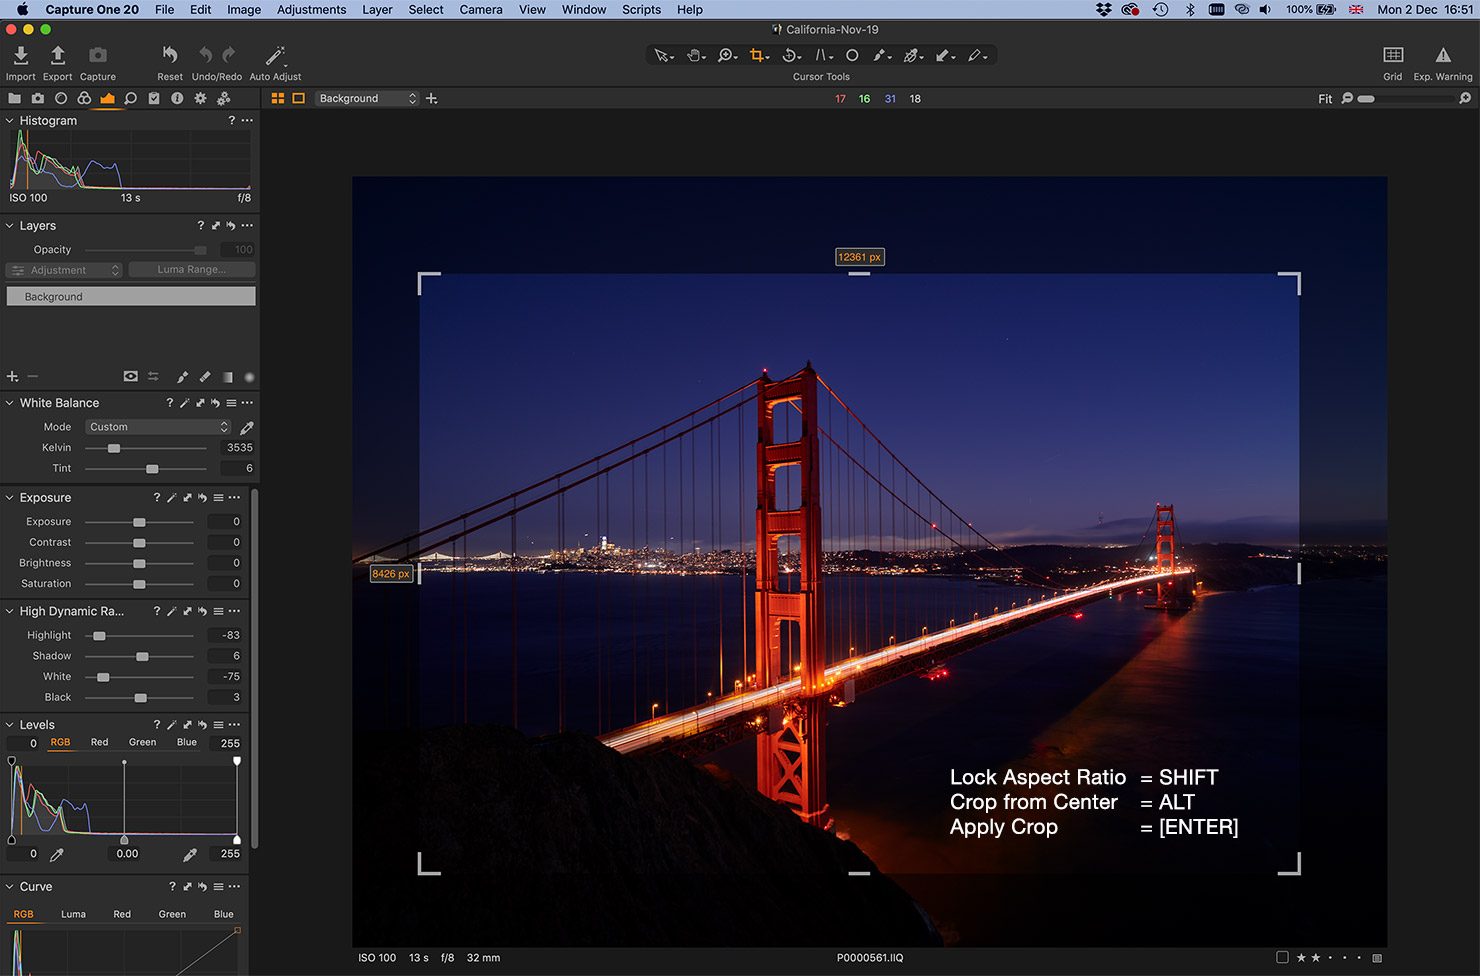
You’ll also find some more obvious (and familiar) handles around the crop area, along with some keyboard inputs that will make cropping a whole lot easier in your workflow.
Holding [SHIFT] will maintain any current aspect ratio and [ALT] will crop from the middle outwards from your cursor’s starting point.
Noise Reduction
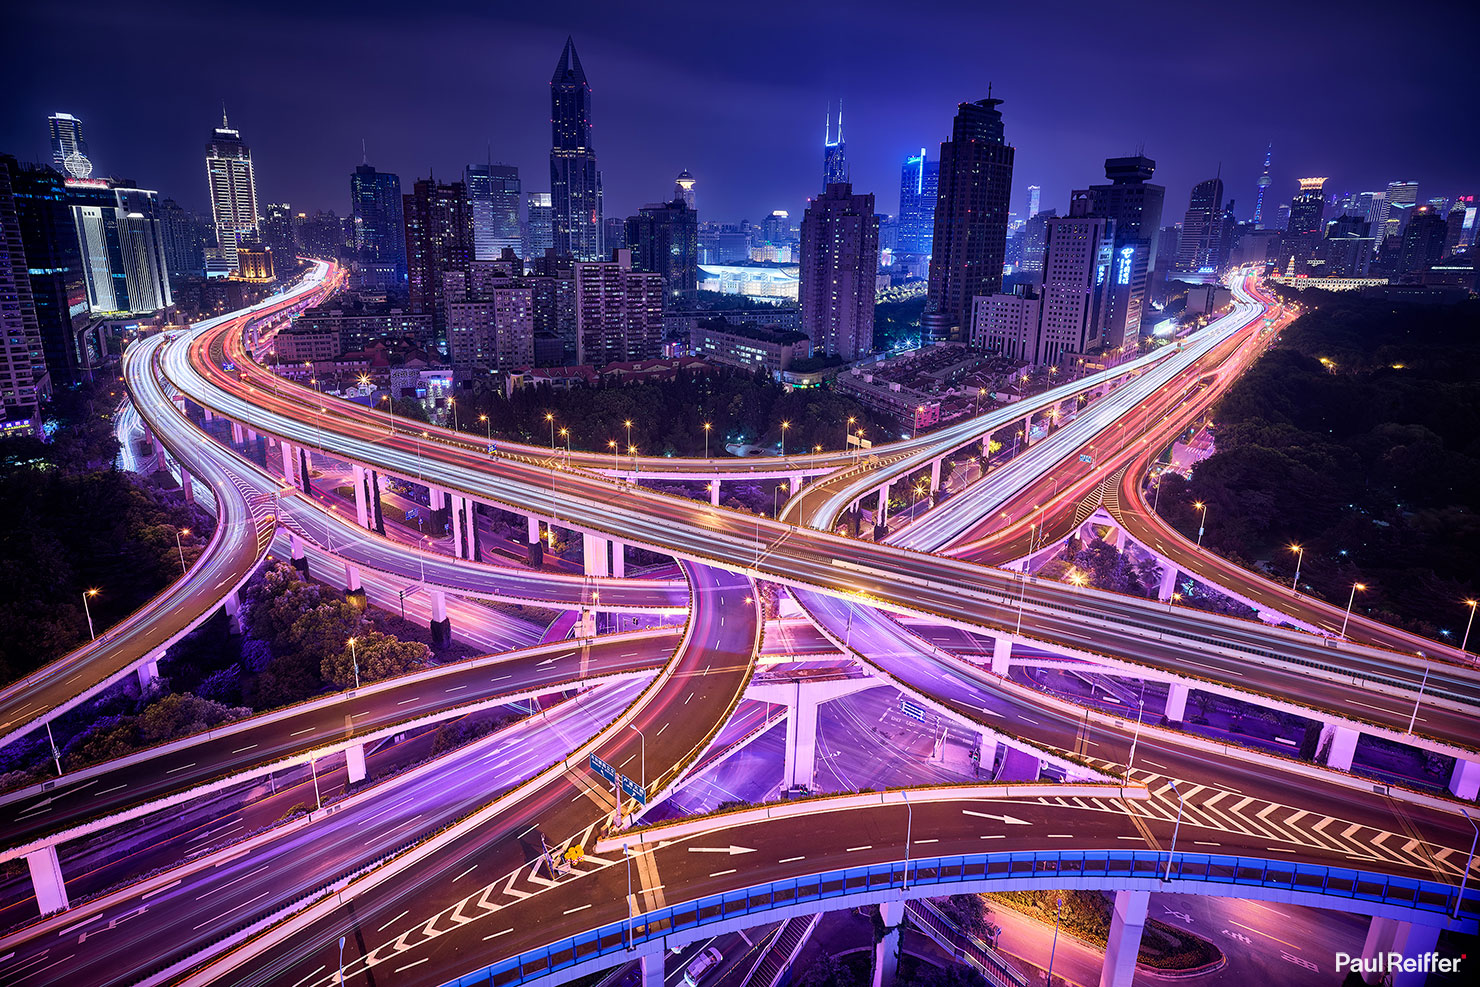
While testing the Phase One XT in China this summer, I also ran some high-ISO tests to see the difference in noise between a single long exposure and that of a Frame Averaged image. At ISO800, the single shot struggled here, but the improvements in Capture One 20’s noise reduction engine have really made a difference.
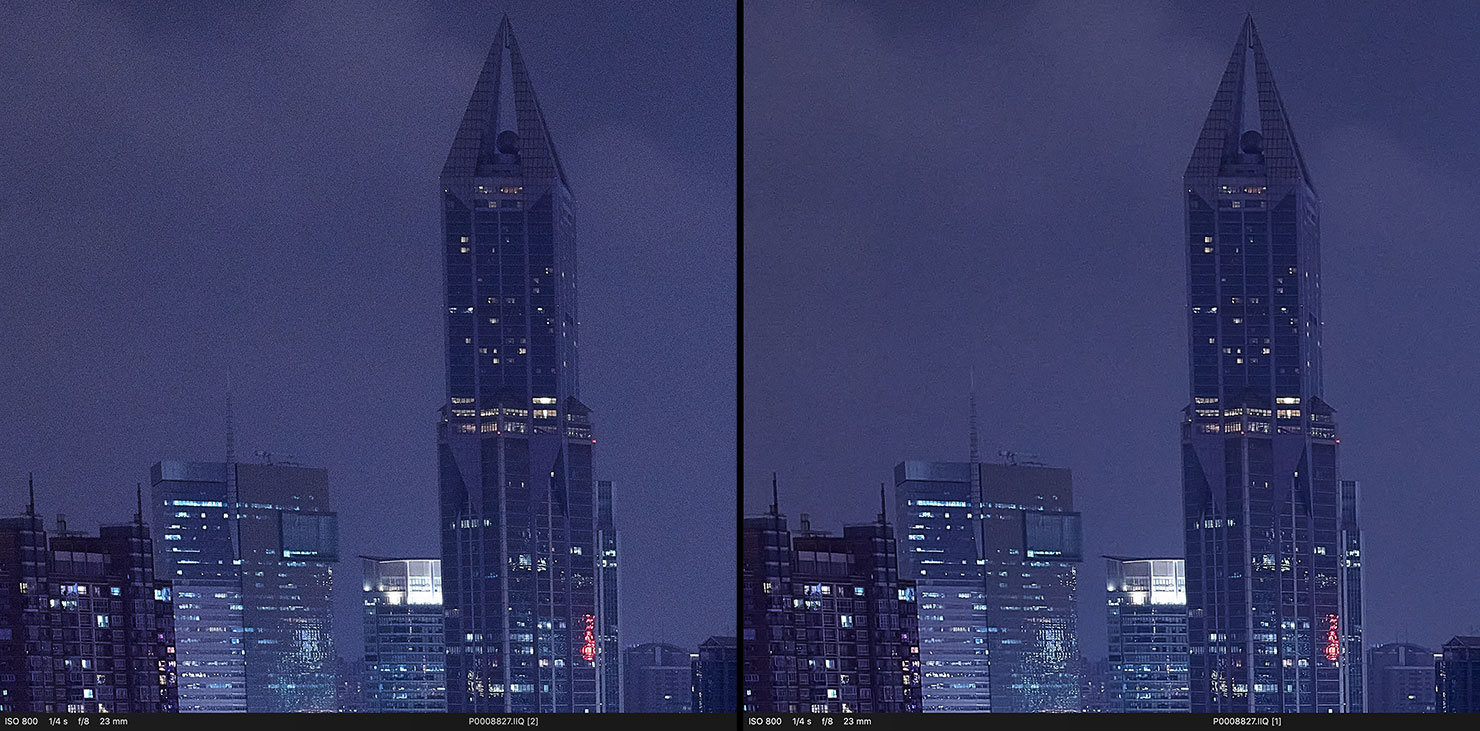
While opinions on noise reduction differ – some like it, some dislike the effects and artefacts it can sometimes generate – it’s fair to say that the “untweaked” import of the same ISO 800 file into Capture One 20 (on the right) is a lot cleaner than the same file in Capture One 12 (on the left).
Which of them you prefer, however, I’ll leave that up to you!
Other Interface & Engine Changes
You’ll find the masking tools a lot easier now, as they’ve been brought forward from their drop-down menus and onto the panel itself for quick and easy access to gradients, etc.

You might also notice that the white balance picker has got a LOT more accurate – thanks to some tweaks made “under the hood”. Where before, if your cursor accidentally fell onto a pixel of noise, it could completely throw out your white balance – the new tool is a lot more intelligent, delivering consistent results time and time again.
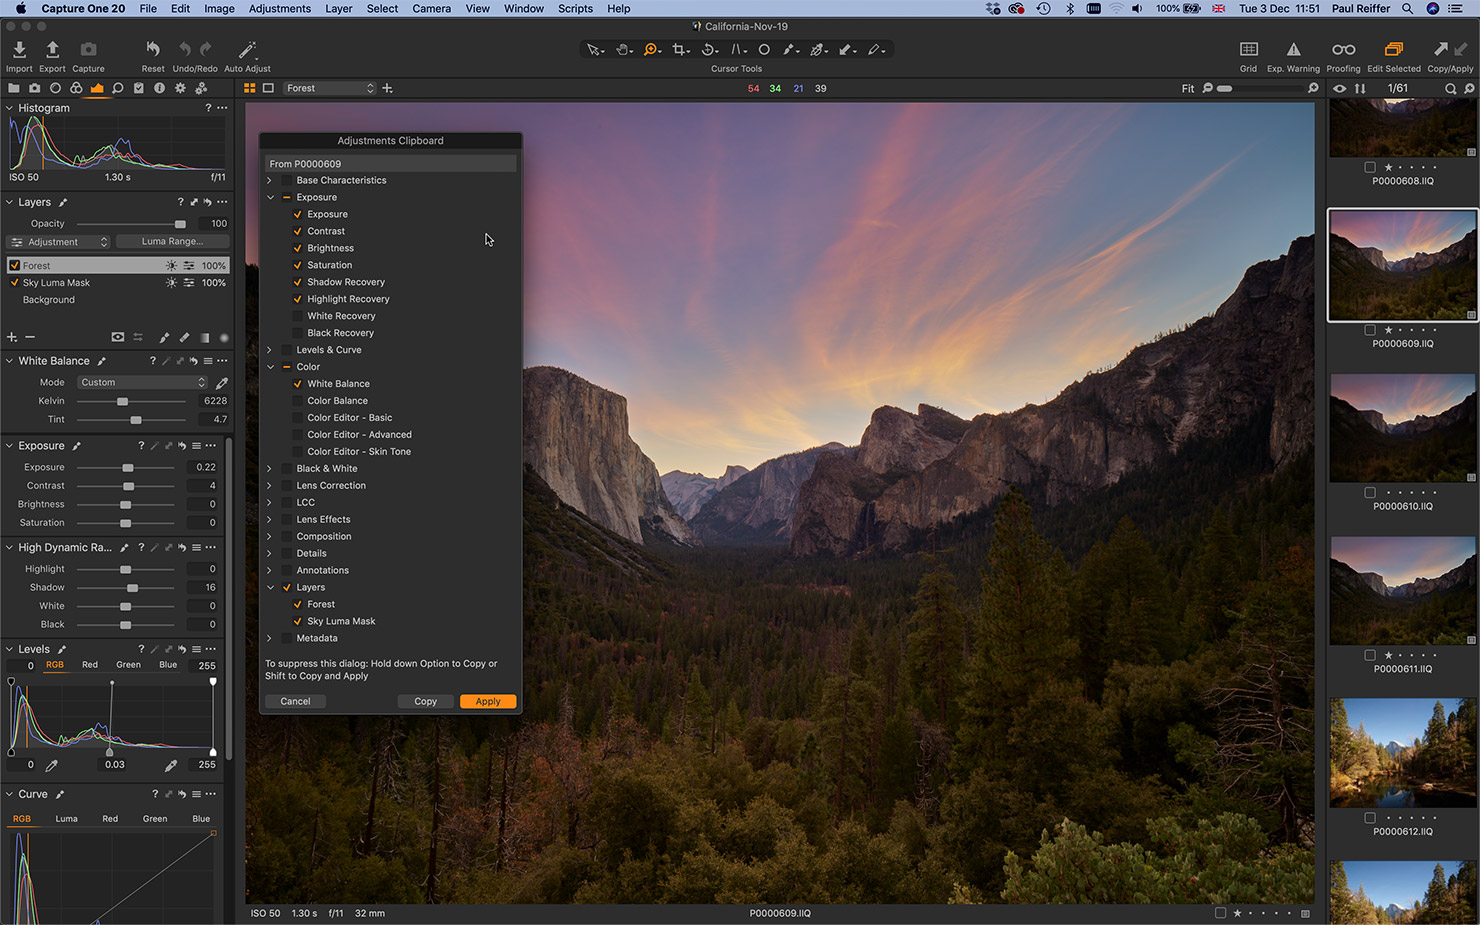
There are improvements to the Copy/Apply Adjustments tool, where things have now become a lot more “layer-aware”, allowing you to select individual elements and layers before applying them to another image as additional layers on top of what was already there.
Capture One has also got a bit smarter with images which have different aspect ratios and dimensions, meaning I’ve been able to copy luma-gradient-masks from one image to another which was cropped, and it’s managed to get it right first time.
While I’ve only really covered the key changes that affect my workflow here, there are others to be found too:
Browser previews are a lot cleaner and more detailed with 50% higher resolution.
There’s a whole new level of DNG integration and colour profiling for previously unsupported cameras, drones and smartphone images.
Studio shooters (or those involved in high-volume editing sessions such as weddings) get a new “Select Next When” function – allowing Capture One to automatically move to the next image once the previous one has been rated or tagged.
Viewer Background Colour
Finally, there’s one “minor tweak” that I know will make a lot of people happy in version 20 (especially those of us who proof for print and dark screens) – gone are the days of having to edit preferences just to change the colour of the viewer’s background!
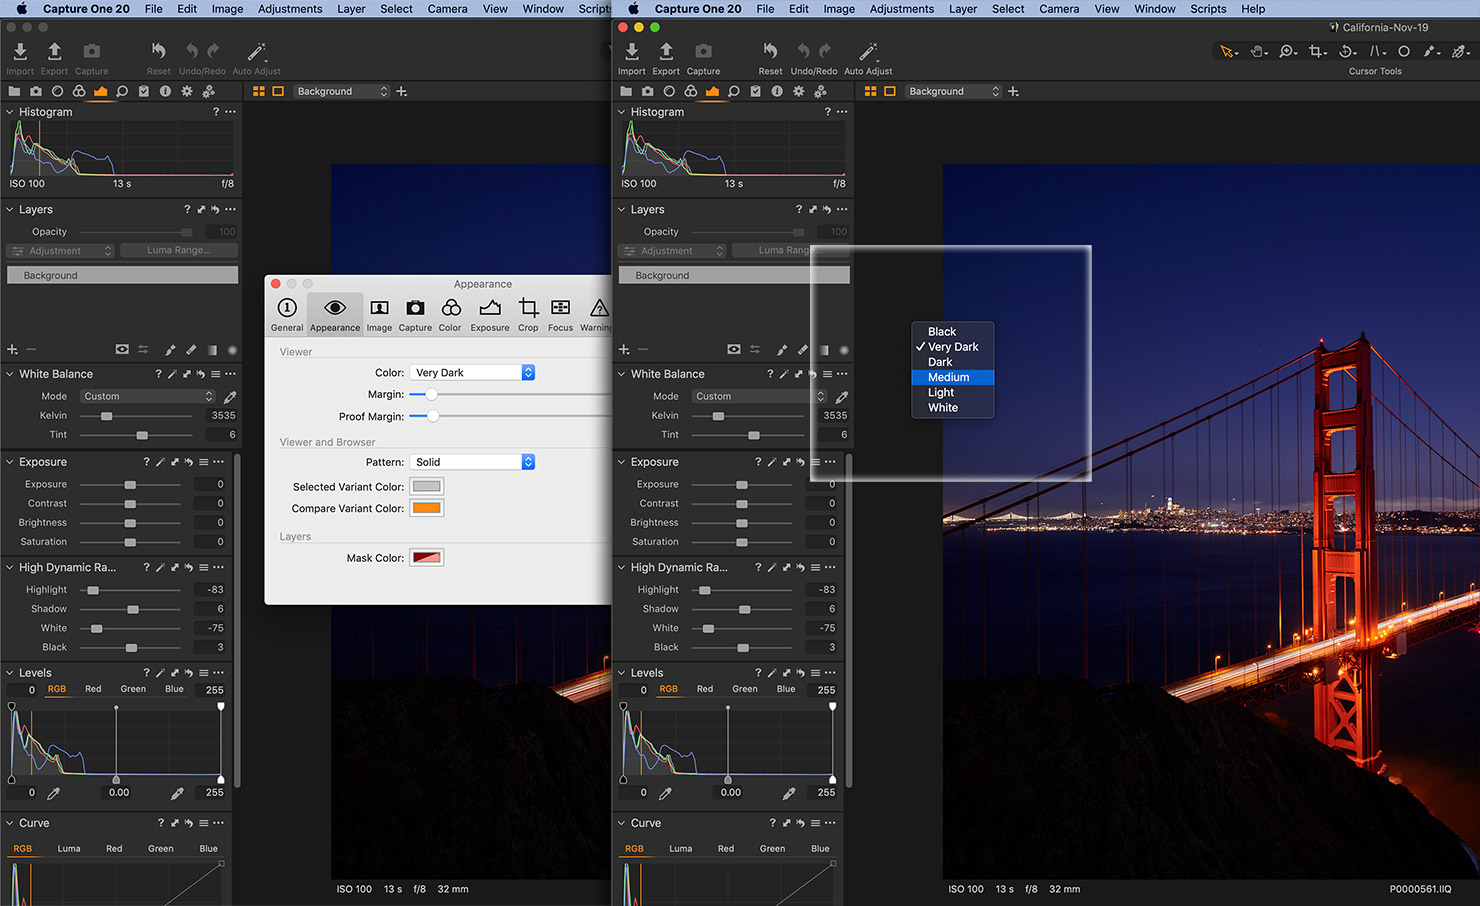
The same options exist as before, but you can now simply right-click on the viewer background itself and choose from the available options, instead of having to hunt down the preference pane and apply it.
Sometimes it’s the smallest things that can bring the biggest smiles!
Upgrading to Capture One 20
For those of you out there on Phase One’s subscription plan, the upgrade from 12 to 20 is already available to you now and (as with all future versions) is included in your monthly fee. Likewise, if you own a Phase One Digital Back, then you also have lifetime access to the latest release of Capture One.
Those who have chosen to buy Capture One outright as a one-off purchase have the option to upgrade for a reduced price.
While I have mixed feelings about both perpetual and subscription licensing, what I have noticed more and more across online forums is the “annoyance” of those who have purchased one-off licenses “because they want to own their software” (hint: you never “own” your software guys…!) every time a new version is released.
My take on things?
If you only upgrade every other version, then the one-off licenses can be a good buy, saving a small bit of cash each year.
However, if always being on the latest and greatest version of any software platform is important to you, then really, the subscription/cloud licensing model was designed perfectly for your way of working – so do consider it instead.
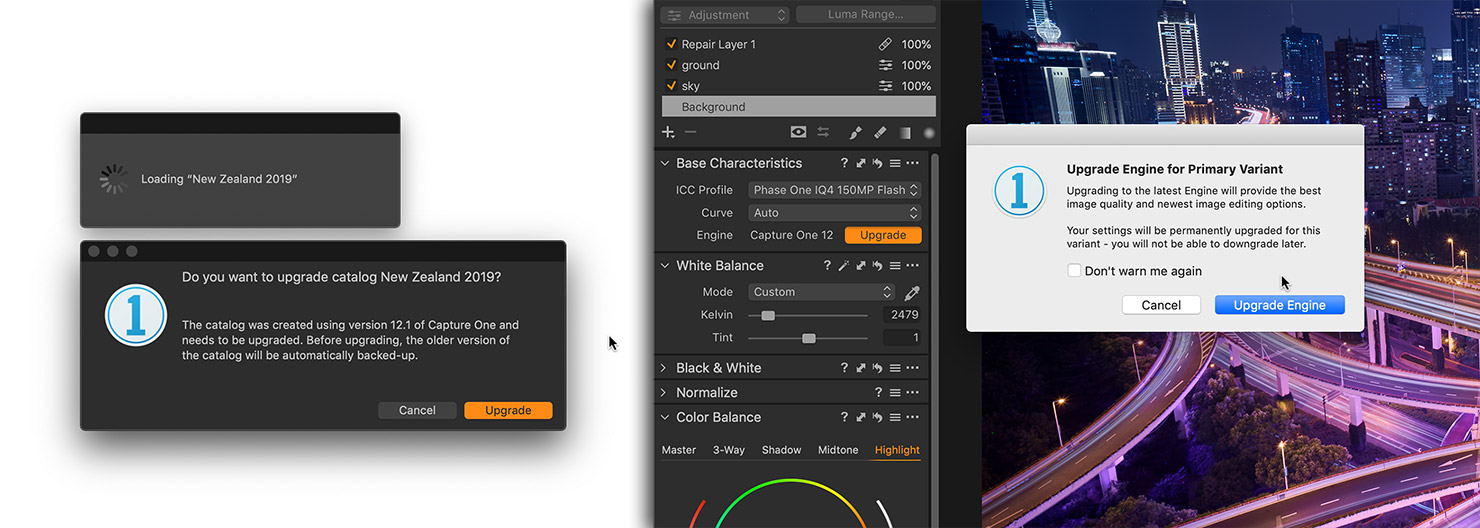
Either way, back up your files before any major upgrade and remember that to complete the switch you’re going to have to upgrade any previous catalogs to v20, along with upgrading the image engine for your files within Capture One itself to make sure they’re being processed with the very latest imaging cleverness out there.
And that’s it – Those who’ve never tried Capture One before, do remember there’s a 30 day fully-functional free trial available from Phase One, along with specific versions for Fuji and Sony camera system users.
Then all that remains is to focus on using Capture One 20 to get the very best out of each and every image you take.